Tuesday, November 24, 2009
Hidden music in Windows XP
Did you know that there's a hidden music in Windows XP? To locate it, just go to C:\Windows\system32\oobe\images and find a file named 'title.wma'. It is a 5 minutes 24 seconds long music that is played as the background sound when you install Windows XP into your computer. But remember, when locating this song, make sure you have selected to view all hidden files and folders by going to Tools > Folder Options >View and then deselecting the option 'Hide protected operating system files'.
Check your mobille phone's IMEI (International Mobile Equipment Identity) number
To check your IMEI number, simply press *#06* on your phone. It will then display a 15 or 17 digit number. That is the IMEI number.
For more information about IMEI, go to http://en.wikipedia.org/wiki/IMEI.
For more information about IMEI, go to http://en.wikipedia.org/wiki/IMEI.
Monday, November 23, 2009
Quck fix for disappearing system icons
Did you ever have your network icon, your battery icon, your volume icon or all missing in your Windows Vista PC? And when you go to the task bar > Properties > Notification tab and you find the three options were missing? Don't worry, because we've got a solution to fix that!
Click on the Start button, then type 'REGEDIT' and press Enter. After that, navigate to and select HKEY_CURRENT_USER\Software\Classes\Local Settings\Software\Microsoft\Windows\CurrentVersion\TrayNotify. Delete both IconStreams and PastIconStream in the right pane. Now open up the Task Manager by pressing and holding Ctrl - Shift - Esc. Go to the Processes tab, select 'explorer.exe' and click 'End Process'. The task bar, with the desktop icons, disappears. After that, go to the 'Applications' tab and click 'New Task...' at the bottom-right of the window. When a window pops up, type 'explorer.exe' and click OK.
By now, the missing icons will appear in the task bar where they originally belong.
Thursday, December 25, 2008
Gimp
This software enables you to create and edit professional-looking pictures in just a few clicks. It also has layers, like Adobe Photoshop. You can also save a picture into many diferent formats, including PSD (Photoshop document) and transparent GIFs. This software also contains powerful drawing tools and some basic tools, for example,a pencil and a magnifier. Overall, this piece of software is best for those seeking for a free and good photo-editor.
System requirements
See website
Price
Free
Download from
gimp.org
System requirements
See website
Price
Free
Download from
gimp.org
Friday, November 14, 2008
Create a compressed ZIP file
You want to send a lot of pictures and music (or anything else) via Email and you do no want to send them individually. Why not send all as a ZIP file? The recipient just needs to extract it and they can use it straightaway after extracting it.
1. Right-click anywhere on your desktop and select New, Compressed (zipped) file.
2. Drag & Drop the documents you want to include into the ZIP file on your desktop.
1. Right-click anywhere on your desktop and select New, Compressed (zipped) file.
2. Drag & Drop the documents you want to include into the ZIP file on your desktop.
Run another OS in Windows
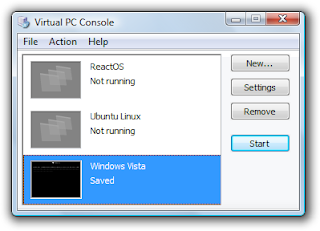
 Do you want to run Linux or any other operating system (OS) free without shutting down Windows? You can by downloading Microsoft Virtual PC 2007 from http://tinyurl.com/mvpc07 first.
1. Run the software by pressing Windows key + R and typing 'C:\Program Files\Microsoft Virtual PC\Virtual PC.exe' (without the quotes). Click on OK.
2. Press New... and follow the instructions.
3. Insert the OS CD. If an Autoplay window appears, close it. If it is an ISO file, skip this step.
4. Click on the OS in the Virtual PC and click on start.
5. Click CD, Use physical drive D (Assuming that D is the drive letter). If it is an ISO file, click CD, Capture ISO image. After that, browse to the ISO file and click Open.
6. Reboot the virtual machine by pressing Right Alt + Del.
Friday, November 7, 2008
Snap screen images
Do you want to take a snapshot of your computer screen (excluding the mouse pointer)? Or only the main window? It's easy...
Skip step 1 for taking full-screen images
1. Click on the window you want to take a snapshot of to make it the main window.
2. Press Print Screen key on your keyboard. (Alt + Print Screen for main window only)
3. Open a graphic-editing software (eg. Microsoft Paint) and press Ctrl + V or Edit, Paste.
4. Click on File, Save as... to save the snapshot.
Subscribe to:
Comments (Atom)
